|
|
1.
d4
|
e6
|
|
|
|
2.
c4
|
Nf6
|
|
|
|
3.
Nc3
|
Bb4
|
|
|
|
4.
Bd2
|
O-O
|
|
|
|
5.
a3
|
Bxc3
|
|
|
|
6.
Bxc3
|
Ne4
|
|
|
|
7.
Nf3
|
Nxc3
|
|
|
|
8.
bxc3
|
b6
|
|
|
|
9.
e3
|
Bb7
|
|
|
Another
idea is 9. .. c5, when Black retains the option of a later .. Qa5.
|
|
|
10.
Bd3
|
f5
|
|
|
|
11.
Qc2
|
d6
|
|
|
|
12.
Ke2
|
|
|
|
White
maybe plans to try a kingside attack, and presumably isn’t comfortable with
12. O‑O‑O, e.g. 12. .. Qe7 13. Kb2 e5 when 14. Bxf5 is met
by .. e4. However, leaving the king in the centre looks worse.
|
|
|
|
Nd7
|
|
|
|
13.
h4
|
|
|
|
If
Black had a pawn at g6 then this would seem natural. Here, White
perhaps aims to support a possible Ng5, and perhaps aims to resolve
discomfort on the a8-h1 diagonal by allowing Rh2. Black ignores all this
and continues preparing e5.
|
|
|
|
Qf6
|
|
|
|
14.
Qb3
|
Kh8
|
|
|
Lest
c5 by White is nasty at some stage.
|
|
|
15.
Rh2
|
e5
|
|
|
|
16.
Bc2
|
e4
|
|
|
|
17.
Nd2
|
f4
|
|
|
Black
pushes on with his pawns before White plays g3, sacrificing a pawn for the
scent of blood.
|
|
|
18.
Bxe4
|
fxe3
|
|
|
|
19.
fxe3
|
Qf2+
|
|
|
|
20.
Kd3
|
Bxe4+
|
|
|
|
21. Nxe4
|
Qf5
|
|
|
Maybe
Black will be able to get off home earlier than expected! (Actually,
dad was still playing a long game in the Major.)
|
|
|
22.
g4!
|
Qxg4
|
|
|
If
22. .. Qg6 then 23. h5 shifts the queen.
|
|
|
23.
Nd2
|
Rae8
|
|
|
23.
.. Qg6+ looks better in general terms, as 24. Ke2 is forced, if loss of material
is to be avoided. However, 23. .. Rae8 may well force a tactical win
of a pawn.
|
|
|
24.
Qd1
|
|
|
|
24.
Nf1 might plug more holes in the dam.
|
|
|
|
Qg3
|
|
|
|
25.
Qe2
|
Qg6+
|
|
|
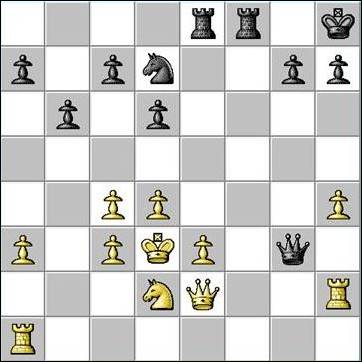
(Position after 25. Qe2)
|
|
Surely
25. .. Rxe3+ won a pawn, e.g. 26. Qxe3 Qxh7, and if 27. Qe7 then
27. .. Qh3+ holds things.
|
|
|
26.
e4
|
Qg3+
|
|
|
Perhaps
26. .. Nf6 and then even doubling rooks on the e-file was better.
|
|
|
27.
Kc2
|
|
|
|
White’s
king is suddenly much safer‑looking.
|
|
|
|
Nf6
|
|
|
|
28.
Rh1
|
Qg6
|
|
|
|
29.
Rg2
|
Qf7
|
|
|
|
30. Rhg1
|
Rg8
|
|